Cardamom Shortbread with Pistachios

When I think of Yotam Ottolenghi, it’s all about the vegetables. Many years ago I was blown away at his London restaurant, Nopi. Literally, that meal was a game changer for me. I discovered that vegetables, both raw and cooked, could be just as craveable as a plate of nachos!

Now Ottolenghi is one of if not my absolute favorite cookbook authors. One of my favorite ways to relax is to pour a glass of wine and curl up with one of his fantastic cookbooks. Jerusalem is probably my favorite – the colors, the food. However, the other books are a nice browse as well. 

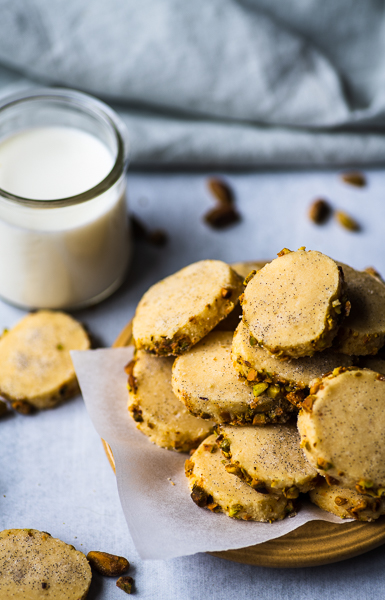
I was recently looking for a quick recipe for cookies that I could take to the coffee fellowship that follows services at our church and came across this delicious cardamom shortbread in Ottolenghi’s namesake cookbook. The recipe was relatively easy, but the included cardamom was just different enough to make them interesting. Well, these cookies were a big hit at coffee that day. One individual even told me it was the best shortbread she had ever tasted, and she’s British. As promised to those that enjoyed the shortbread last week, I am now posting the recipe on Jeannine’s Cuisine.

Cardamom Shortbreads with Pistachios

Yield 2 Dozen Cookies

A couple of notes about ingredients – You could use about a quarter teaspoon of ground cardamom, but do try to find cardamom seed, and grind it yourself for the most flavor. Vanilla sugar is available online. Try to find one that is made with vanilla bean pods, that include the seeds rather than vanilla extract. Another option is to just place a couple of slit open vanilla beans in a plastic container with a cup of sugar and infuse the sugar as long as you like. You could also use turbinado sugar for sprinkling.

8 cardamom pods or 1/4 teaspoon ground cardamom

4 tablespoons ground rice

3/4 cup plus 1 tablespoon butter

2 cups all purpose flour

1/2 teaspoon fine salt

4 1/2 tablespoons powdered sugar

1/2 cup shelled toasted and salted pistachio nuts

1 egg, lightly beaten

2 tablespoons vanilla or turbinado sugar

Crush the cardamom seeds either in a mortar and pestle or perhaps with a small hammer or the back of a knife. Remove the bits of cardamom peel and crush the tiny seeds into powder. A small electric coffee grinder is a good tool for this. You can then use the same coffee grinder to crush the rice and clean out the grinder at the same time. 

Place the cardamom, ground rice, butter, flour, salt, and powdered sugar in the bowl of a stand mixer and use the paddle attachment to blend the mixture only until it forms into a paste. 

Flour your hands and your work surface and roll the paste into a log about 1.25 inches in diameter. Roll the log in plastic wrap and refrigerate it for one hour.

Using a nut grinder or a food processor, chop the pistachios. You don’t want them too finely chopped. A medium chop with some tiny bits and some that are a little bigger is the goal. Place the nuts into a shallow pan or tray large enough to hold the dough log. If you have to cut the log in half crosswise, that’s okay.

Beat the egg in a small bowl and brush the log with the blended egg. Roll the log in the pistachios, pressing them into place when necessary. Wrap the nut-covered log in plastic and refrigerate for half an hour. Preheat the oven to 300.

Prepare two cookie sheets or half-sheet pans with parchment. Remove the plastic wrap from the log and slice it crosswise into 1/4-inch slices. Place the slices on the prepared sheet pans, about an inch apart. Sprinkle the slices with vanilla sugar or turbinado sugar. Bake until golden, but not brown, about 20 minutes. Allow the cookies to cool completely before storing them. 

Adapted from Ottolenghi – The Cookbook by Yotam Ottolenghi and Sami Tamimi

Rhubarb Pie

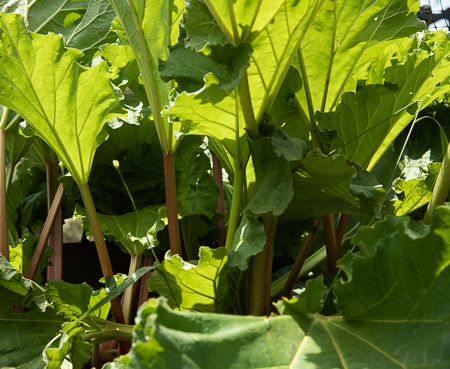
One advantage to living in Montana is that we actually have a Spring here, unlike the Spring season in Virginia that lasted about a week before the heat and humidity set in. Granted, it’s a little chilly. The Farmers’ Almanac reported that the last freeze in Helena, Montana would take place on or around 20 May, and they were right. It snowed on 21 May. But the good thing is, with a longer spring season comes a longer season for spring fruits and vegetables. I’m looking at you, rhubarb.

I think it was about March when my sister told me that the rhubarb at my parents’ house was starting to come up. One month later my dad pointed out a huge bush with enormous leaves and told me to take all I wanted. I took him up on his offer, but also took note when he mentioned there was a specific rhubarb pie his mother made when he was young. He received a couple of those pies for Fathers’ Day this year.

In most parts of the country, rhubarb’s spring fling is long past, and everyone is harvesting the summer vegetables in their gardens. However, here in Montana, rhubarb is still very much in evidence at all the stands at the farmers’ market as well as in my dad’s garden. 

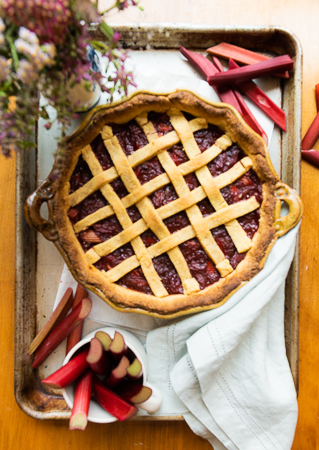
This is a pretty straight forward rhubarb pie. Although strawberry rhubarb pie is also a favorite, I like the taste of the rhubarb with no additions. I’ve left the choice of pie crust up to you on this one. My absolute go to pie crust is Martha Stewart’s Pâte Brisée from Martha Stewart’s Baking Handbook. If you don’t have the book, you can find the recipe here. It comes together in the food processor in seconds, and you can make and cool your filling while the dough rests in the refrigerator. Although you do not need to bake the crust ahead of time, I like to brush the bottom crust with a coat of beaten egg and bake it for 5 minutes before filling it to avoid the fruit making the crust soggy.

Rhubarb Pie

One 8-inch Pie

This pie is delicious as just a stand-alone fruit pie, but it is even better with ice cream. Or, if you aren’t in the mood to make the crust, the filling is very good on its own as a sauce over ice cream, or even yogurt for breakfast. 

dough for a double crust for an 8-inch pie

1 egg

2 pounds fresh rhubarb

1 1/4 cups dark brown sugar

Prepare your choice of pie crust and place in the refrigerator to rest for 30 minutes. Meanwhile, make the pie filling. Wash the rhubarb stalks, and cut off the discard the woody ends. Slice the rhubarb stalks lengthwise, then crosswise into 1/2-inch chunks. Set aside 2 cups of the sliced rhubarb and place the remainder in a medium size saucepan. 

Add the brown sugar to the pan, cover, and turn on the stove to medium-low. This step will get the rhubarb to begin releasing its juices. Cook covered for about 15 minutes. Remove the cover, increase the heat to medium and cook another 15 minutes, stirring often. The rhubarb is done when it is completely broken down, and a spoon leaves a clean trail across the bottom of the pan. Add the remaining rhubarb chunks to the pan and give it a good stir. Place the rhubarb filling on a plate or sheet pan and set aside to cool. 

While the rhubarb is cooling prepare your pie crust. Preheat the oven to 375. Remove the pie dough from the refrigerator. Divide the dough in two, roll out the bottom crust and place in an 8-inch pie pan, trimming to fit if necessary. Beat the egg in a small bowl and brush the bottom crust with just enough egg to cover. Bake the pie crust for 5 minutes. Prepare the top crust by rolling it out or preparing a lattice. Add the rhubarb filling to the bottom crust and top with the crust of your choice, crimping the edges together. 

Place the pie pan on a sheet pan. Bake the pie for 1 hour until the filling is bubbly. Take care that the crust does not get too brown. You might need to cover the pie loosely with foil if it is browning too rapidly. Remove the pie pan to a rack and cool completely before serving.  

Pie filling adapted from Good to the Grain, Baking with Whole-Grain Flours by Kim Boyce

Whole Wheat Banana Chocolate Chip Tea Cake


Tea Bread 1

I truly hope all of you are staying healthy during these challenging times. There are some silver linings in the quarantine clouds.  Many people are baking more and conducting experiments in the kitchen, and I’m right along there with them. At least, so far, my clothes still fit.

Tea Bread 4

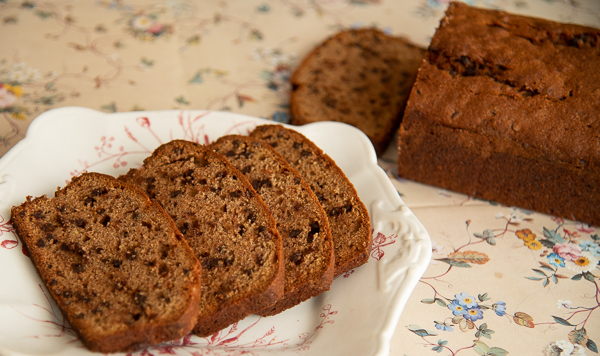
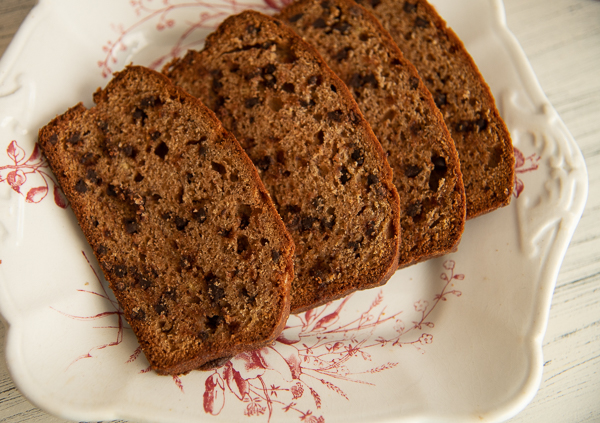
One new habit I’ve picked up recently is afternoon tea served with some sort of baked good.  This week it’s this Whole Wheat Banana Chocolate Chip tea cake, a recipe that I’ve been baking for years.  We had some elderly bananas to use up, I thought of this, and I’m so glad I did. The bananas make the cake super moist. If you warm it up, the chocolate chips become a little gooey, and it makes for a yummy snack with a cup of tea.

One important note – the first time I made this, it glued itself to the pan. That’s how I also know this cake makes a great trifle.  After chiseling cake chunks out of the pan, I realized that it was just too good to throw away, so I layered them in a glass bowl with some pastry cream. Now when I make this, I grease the pan, cover it with parchment and grease that as well.

Tea Bread 3

The original recipe also calls for sifting the dry ingredients.  I usually just use a whisk and you can do that too. However, the last time I was in Helena, Montana, I found this really cool old sifter at a place called Golden Girls Antiques Mall. Wow! What a store —­ it’s huge and they have anything old that you can possibly imagine. I’ve got my eye on their huge selection of Fiesta Ware in every color imaginable.  This could be a problem for my pocketbook as well as kitchen storage after we move there.

Tea Bread 2

I especially love that this sifter says Acme. My favorite cartoon as a child (and even now) was Wile E. Coyote and the Road Runner. Acme was frequently seen as the brand of choice for all the tools the coyote used to try to capture the Road Runner. Now I’m reliving my cartoon-watching childhood by using an Acme sifter for baking.


Tea Bread 5

Whole Wheat Banana Chocolate Chip Tea Cake

Yield: 1 9-inch Loaf

I swapped out half of the all-purpose flour for whole wheat to give this cake a little more fiber, but that’s totally optional. If you use very ripe bananas, no need to mash them first; just toss them into the mixer bowl while it’s running. This cake freezes really well. Just warm up individual frozen slices in the microwave.

1 cup all-purpose flour

1 cup whole wheat flour

2 teaspoons cocoa powder

1/2 teaspoon baking powder

1/2 teaspoon baking soda

1/4 teaspoon salt

1 cup miniature semisweet chocolate chips

8 tablespoons (4 ounces) butter

1 cup sugar

2 large eggs

2 teaspoons vanilla extract

3 small (1 cup) very ripe bananas

Preheat the oven to 350 degrees. Grease a 9-inch loaf pan, cover in parchment, and grease again.

Sift the flours, cocoa, baking powder, baking soda, and salt onto a piece of parchment or waxed paper or whisk in a bowl. Place the chocolate chips in a small bowl and mix with one teaspoon of the flour mixture.

Using a mixer fitted with a paddle, cream the butter on medium speed for 3 minutes. Add the sugar in two additions, beating for 2 minutes after each addition.  Add the eggs one at a time, beating for 30 seconds after each one.  Add the vanilla extract and bananas and mix well, scraping down the bowl as necessary.  Switch the mixer to low speed and add the flour mixture in two batches mixing just until the flour is mixed in.  Be careful not to overmix. Stir in the chocolate chips.

Scrape the batter into the prepared pan.  Bake for 1 hour or longer, until a toothpick comes out clean.  Cool the hot pan on a rack for 10 minutes then remove the cake from the pan and place on a rack until completely cool.

Adapted from Chocolate Chocolate by Lisa Yockelson


Swedish Rye Bread

Rye Bread 1

I learned to bake bread while living in El Salvador, from my supervisor’s wife, who learned the skill out of necessity when they lived in Nepal. It’s a small world, isn’t it?  She hosted some of the Embassy personnel at her house for bread baking workshops.  We would get all the bread doughs ready in the morning, then hang out at the pool drinking ice cold Presidente beer until it was time to bake.  Somehow the bread got made in spite of the copious amount of beer that was consumed.

Rye Bread 2

I came across this recipe while sorting through my card file of old favorites.  I used to make it all the time in El Salvador, and realized I had not made it in many years. I lived in a high rise apartment building along with a lot of the other military personnel who were assigned to the U.S. Embassy at the time.  Since I got off work before my Army buddies, I became the defacto cook for all of us. They bought the groceries, and I did the cooking.  I thought it was a pretty good deal.

Rye Bread 3

When the commissary started carrying frozen corned beef briskets, we decided it was time for Reuben sandwiches, one of my favorites to this day. Somehow we managed to locate almost all of the necessary ingredients. The only problem was where to find the rye bread for the sandwiches.  Well, I’ve never been the type to shrink from a culinary challenge, and rye bread was no different. This is the rye bread recipe I used.

Rye Bread 4

Swedish Rye Bread

2 Loaves

This Rye Bread is a little on the sweet side, but it goes with everything from corned beef to just butter and jam or smoked salmon, Scandi style. I’ve provided the baking time; however the best way to tell if the bread is done is to use an instant read thermometer.  You want the bread to be between 205 and 210 degrees. Always let freshly baked bread cool completely before slicing into it.

1 packet or 2 1/4 teaspoons yeast

1/4 cup warm water, 105-110 degrees

1 teaspoon sugar

1/4 cup brown sugar

1/4 cup molasses

1 tablespoon salt

2 tablespoons shortening

1 1/2 cups hot, but not boiling, water

2 1/2 cups rye flour

3 tablespoons caraway seed

3 1/2 – 4 cups all purpose flour

Soften the yeast by placing it in a small bowl with 1/4  cup water and 1 teaspoon sugar. Stir and set aside until foamy.

In the bowl of a stand mixer combine the brown sugar, molasses, salt, and shortening with the paddle attachment. Add hot water and stir until sugar dissolves. Note: the shortening will not completely dissolve in the liquid. Cool until lukewarm to touch, then add the rye flour and beat well. Add the yeast mixture and the caraway seed and mix well. Switch out the paddle with the dough hook. Start adding all purpose flour about a half a cup at a time and mixing it in before adding more. Add enough of the flour to make a moderately stiff dough. The dough will be sticky but not so stiff that the hook cannot get through it. Continue kneading the bread dough in the mixer until the surface is smooth and satiny.  This should take about 5 minutes or a little less. Place the dough into a lightly greased bowl, turning it over once to oil the surface. Cover and let rise in a warm place until doubled in size, about 1 1/2 hours.

Punch down the dough and turn it out onto a lightly floured surface. Divide it into two portions and shape each into a smooth round loaf. Place both loaves on a half sheet pan, cover, and let rise until doubled in size, about an hour. Bake at 375 degrees 25-30 minutes. Place foil loosely over the tops for the last 10 minutes to avoid over baking. Cool on a wire rack.


Skillet Cornbread – The 10-Year Rotation

Cornbread 1

Cornbread is a side dish that’s part of our New Year’s Day dinner table every year. That’s because it goes so well with black-eyed peas, which I have been eating almost every New Year’s Day since I was old enough to hold a spoon. Hoppin’ John, the iconic dish that is supposed to bring you good luck throughout the year if you eat it on New Year’s Day, is a family tradition with my family. I can’t speak to how much good luck it brings – on the few occasions I have not had black-yes on New Year’s Day, I have not noticed that much difference. However, black-eyed peas cooked with a lot of pork are pretty tasty.

Cornbread 2

It’s no secret among my friends and family that I love trying out new recipes. We finally settled on a black-eyed pea recipe several years ago – 1 pound of black-eyed peas, an onion or two, and two pork knuckles cooked together in water until falling apart. This year, however, I decided to mix things up and made something called Hoppin’ Juan from the Local Palate magazine instead. Once in awhile I make a dish that, although it might turn out really good, you’ll never see on this blog. That’s because they take ALL DAY or even longer to prepare. If I don’t have time to do that I know you don’t. The Local Palate is a beautiful magazine that I subscribed to until I realized that almost all of the recipes are the “cheffy” type (and this coming from someone who went to culinary school – life happens) that take too long or that require scores of meticulously prepped ingredients you probably don’t have in your kitchen and will never use again. Well, Hoppin’ Juan was all of that and more. It was composed of Sea Island Red peas (ordered from Anson Mills), cooked with chorizo and Carolina gold rice, and served with a home-made salsa verde. It was delicious. Would I make it again? Probably not, because it was so labor intensive. We’ll be back to our usual next year.

Cornbread 3

I’m still working on finding the perfect cornbread recipe.  My husband jokes about the 10-year rotation we have on recipes. Okay, everyone needs a hobby. One of mine happens to be trying new recipes. This cornbread is pretty close to becoming “the one.” It’s made in a smoking hot cast iron pan greased up with plenty of lard or bacon grease before adding the cornbread batter. The result is a crispy shell with delicious corny cornbread taste. (That sentence would never get past our editors at work, but one of the things I love about blogging is that I can write what I’m thinking, even if it’s not perfectly, grammatically correct.)

Cornbread 4

Skillet Cornbread

6 Servings

I make this this recipe with lard because I always have it on hand. However, you can also use bacon grease, butter, or even shortening. You could also bake it in an 8-inch square pyrex dish if you don’t have a cast iron skillet with good results, but you will not get the crunchy crust on the outside

1/2 cup all purpose flour

2 teaspoons baking powder

1 teaspoon baking soda

1 1/2 cups yellow cornmeal

1 large egg

1 3/4 cups buttermilk

2 tablespoons fat of choice (lard, bacon grease, butter, or shortening)

Preheat the oven to 400 degrees. Place the dry ingredients in a bowl and whisk to mix.

Place the egg and buttermilk in a separate small bowl and beat to combine. Add to the dry ingredients and stir until just combined. Be careful not to overmix. If the mixture looks a little dry add up to 1/4 cup of more buttermilk.

Heat a 9 or 10-inch cast iron skillet on high heat. Add the lard to the pan and melt. Add the batter to the pan, spread evenly and immediately place the pan in the hot oven. Bake for 30 minutes or until a knife inserted in the middle comes out clean.

Adapted from Saveur Cooks Authentic American by the Editors of Saveur Magazine


Swedish Ginger Cookies

Ginger Cookies 1

Merry Christmas!  It might be a little late in the season for another cookie recipe, but these are so good, you might want to consider making them for a Boxing Day or New Years get together, which is what I did.  Or, there is always next year.

I’ve been on a Scandinavian kick lately.  Maybe it’s our planned summer trip to Denmark and Norway.  Maybe it’s because it is now winter, and I’ve fallen in love with all things hygge, the Danish and Norwegian word for cozy. You know – sheepskin rugs, wooly blankets, steaming hot mugs of coffee served with cardamom sweet buns… Then I wake up and realize it’s just a dream.  Make these cookies and curl up in front of the fire with a cup of tea or coffee, a critter or two and you can live the dream too.

Ginger Cookies 2

The key ingredient in this recipe is the bacon fat.  Make the cookies with butter if you must, but you will be missing out on the vague smokiness that makes this cookie something different.  There is a nice little kick from the ginger and molasses too.  The first time I made these, I realized they were going to have to go into my annual Christmas baking rotation.

Ginger Cookies 3

Swedish Ginger Cookies

3 Dozen

Fry up a pound of good quality bacon, and save the fat for these cookies. Serve with a steaming hot cup of coffee or tea.

3/4 cup bacon fat

1 cup sugar, plus 1/4 cup extra for rolling the cookies

4 tablespoons molasses

1 egg

2 cups all purpose flour

3/4 teaspoon salt

2 teaspoons baking soda

1 teaspoon ground ginger

1 teaspoon ground cloves

1 teaspoon cinnamon

Preheat oven to 350 degrees.

Cream the bacon fat and the sugar together in the bowl of an electric mixer outfitted with a paddle. The fat mixture will stick to the sides of the bowl.  Just use a spatula to push it back down before adding the molasses and egg and mixing it in. Add the remaining ingredients and mix thoroughly.

Ginger Cookies 4

Shape the dough into walnut-size balls and roll in the sugar. Place the cookies on baking sheets covered in parchment and use the palm of your hand to flatten them.

Bake the cookies for 10-12 minutes until golden brown and cracked around the edges. Cool the cookies on a wire rack.

Adapted from Christmas with Martha Stewart Living


Salt-Crusted Caraway Rye Bread


Rye Bread 1

This year we decided to celebrate Thanksgiving at one of my favorite restaurants, The Inn at Little Washington. Unfortunately, the visit to the restaurant coincided with my recent return from a trip to Africa, where I picked up a pretty nasty bug that accompanied me home, where it continued to wreak havoc on my digestive system for weeks. As anyone who has been there knows, the restaurant is not cheap and is best reserved for special occasions for that reason. So imagine my dismay when I could barely get through the meal. Fortunately the obliging and very well-trained wait staff packed up my Thanksgiving dinner for me to take home. It was just as good the next day, even if I wasn’t eating it in such elegant surroundings.

Rye Bread 4

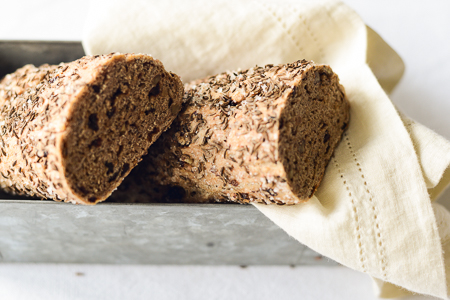
Fortunately, I could eat bread in spite of being so sick. This bread was served with several others in the bread basket at the restaurant. All were really good, but this one was a standout for both me and my husband. The crunch of the salt and the caraway seeds on the outside was a nice contrast to the currants and nuts in the bread, and butter only made it better. Weeks later, when I volunteered to take an appetizer to a dinner party, this bread with a couple of different spreads was what I chose to take.

Rye Bread 2


Salt Crusted Caraway Rye Bread

3 Cocktail Size Loaves

I served this bread at a dinner party as an appetizer with the smoked trout spread from an earlier post and with honey butter, both to rave reviews from the dinner guests. The bread also works well with thin slices of cheese or smoked salmon. It also freezes well, making it ideal to have on hand for unexpected guests.

1 tablespoon yeast

1 tablespoon sugar

7 1/2 tablespoons caraway seeds, divided

1 tablespoon salt

2 1/2 cups rye flour

3 cups bread flour, plus more for dusting

2 cups warm (95 degrees) water

1 cup coarsely chopped pecans

1 cup dried currants

1/4 cup kosher salt

Combine the yeast, sugar, 1 1/2 tablespoons of the caraway seeds, the tablespoon of salt and both flours in the bowl of an electric stand mixer fitted with a dough hook. Mix until thoroughly combined then slowly add the warm water with the mixer running. Continue to mix until the dough forms a ball and starts to pull away from the sides of the bowl, about 2 minutes. Add the pecans and currants and continue to mix for an additional 2 minutes. Turn the dough out onto a floured board, wipe out the bowl and spray it with cooking spray. Place the dough back in the bowl, cover with a towel and set in a warm place until it has doubled in size, about 1 hour.

Punch the dough down, divide into thirds and form each into a slender loaf about 12 inches long and 2 inches in diameter. Combine the kosher salt and the remaining caraway seeds in a small bowl. Brush the loaves with water and coat them with the caraway seed mixture, using your fingers to pat as much of the mixture as possible into the dough, as shown in the photo below.

Rye Bread 3

Place the loaves on a lightly greased sheet pan and set in a warm place for about 20 minutes. Meanwhile preheat the oven to 350 degrees. Bake the loaves for 30 minutes, turning the pan every 10 minutes so they brown evenly. Cool on a wire rack.

Adapted from The Inn at Little Washington Cookbook by Patrick O’Connell


Orange-Scented Baklava with Almonds and Hazelnuts

Baklava 1

In about 2 weeks, my husband and I will be departing for Athens, Greece, to explore cruising for the first time. We decided on a week-long cruise that begins in Athens and ends up in Venice, Italy. We’ve also added a few extra days at the beginning and end to extend the trip. It’s a vacation that we have been looking forward to for a long time.

With the Mediterranean on my mind, I’ve been reading a lot of Mediterranean cookbooks lately. The upcoming trip has definitely had an influence on my cooking as well.

Baklava 3

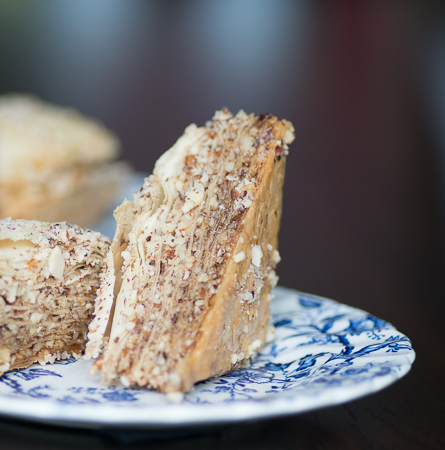
This baklava is a little different than what you typically find in a standard Greek restaurant. It includes the addition of cinnamon, cloves, and orange, which gives it an almost exotic flavor. Additionally, rather than the usual walnuts, it includes almonds and hazelnuts. Do not be put off by working with filo; yes, it can be a little tedious, but the end result is so worth it.

I used Flor di Sicilia in this dessert. It’s an orange and vanilla flavoring available from King Arthur Flour. It’s wonderful in this baklava, and I can’t wait to try it in other dishes. It’s pretty strong, so a little goes a long way.

Baklava 2

Orange-Scented Baklava with Almonds and Hazelnuts

18 Pieces

If you don’t have or can’t get the Flor di Sicilia, you can substitute 1 1/2 teaspoons of orange flower water. Allow frozen filo to thaw for 24 hours in the refrigerator. It will take 1 1/2 to 2 hours to bring it to room temperature.

1 cup whole almonds

1 cup hazelnuts

3 tablespoons sugar

1 teaspoon ground cinnamon

1/4 teaspoon ground cloves

1 pound filo, room temperature

6 tablespoon butter, melted

3/4 cup honey

1/2 teaspoon King Arthur Flour Flor di Sicilia

Place the nuts in a bowl of a food processor and pulse until finely chopped. Take out 3 tablespoons of the nuts and set them aside to be used for garnish. Add the spices and the sugar to the nuts in the processor bowl and pulse to blend. Transfer the nut mixture to a medium size bowl.

Remove the filo from the box and trim it so that all the sheets fit in an 8-inch square baking pan. (I used a standard Pyrex one.) Use one of the filo sheets to check the size of your pan. You don’t want it creeping up the sides of the pan. Cover the stack of filo with plastic wrap and a damp towel. You’ll need to make sure you keep it covered as you are working with it, so avoid having it dry out and break.

Place a sheet of filo in the bottom of the pan and brush it lightly with melted butter. The six tablespoons should be just enough butter to assemble the baklava, without it becoming a greasy, soggy mess. Add another layer of filo and brush with butter. Continue until you have six sheets of filo in the bottom of the pan. Sprinkle the filo with 1/3 cup of the nut mixture. Top with three more sheets of buttered filo, then another 1/3 cup nut mixture. Continue with the three sheets of filo and 1/3 cup nuts until you have used all the nuts. Ideally you will have seven layers of nut filling. Top the last layer of nuts with 6 more sheets of buttered filo as you did in the beginning. Place the pan of baklava in the freezer for 30 minutes. This will make it easier to cut.

Position an oven rack in the middle of the oven and pre-heat it to 350 degrees. Remove the baklava from the freezer. The butter is now cold enough to cut the baklava without smashing it or having it bounce out of the pan. If a piece does come out, just place it back where it belongs. Using a long thin serrated knife (a steak knife or a tomato knife is good for this) cut the baklava into thirds all the way through to the bottom. Rotate the pan 90 degrees and cut it into thirds again. You should have nine squares. Cut each square in half on the diagonal. Place the pan in the oven and bake for 25 minutes. Turn the oven down to 300 degrees and bake until golden brown, about 20-25 minutes more. Allow the baklava to cool.

When the baklava is almost cool, make the syrup by heating the honey in a saucepan on the stove until it begins to simmer. Remove the pan from the heat and add the Flor de Sicilia or orange water. Pour this mixture over the cooled baklava and sprinkle with the remaining nuts. Allow the baklava to sit uncovered at room temperature for at least 2–3 hours; however, 8 hours is best.

To serve run a knife along the cut marks and gently lift the baklava out of the pan. Allow one to two triangles per serving. You can store the baklava loosely covered at room temperature for 5 days. You can also double-wrap it tightly in plastic wrap and freeze it.

Adapted from Desserts – Mediterranean Flavors, California Style by Cindy Mushet

Kirsch Kuchen (Sour Cherry Cake)

Cherry Cake 1

While I was shooting the photos for this post, my production assistant, Cloudy had a few ideas of his own.  I didn’t even realize he made it into this photo until I started processing.

Cherry Cake 3

This is what I would call a tea cake. It’s the perfect snack on a cloudy Sunday afternoon. I’ll be having mine with a cup of tea while I thumb through a couple of new books and procrastinate about doing the laundry. Perfect!

Cherry Cake 2

This is a very popular cake in Germany. It’s made with a variety of different fruits, depending on the season. The first time I had this cake was at a café in downtown Stuttgart in the fall. It was made with the same small dark plums that grew in our backyard in Herrenberg.

Cherry Cake 4

Many German pastries are not very sweet, this one included. If you are looking for something really sweet and rich, you would be better off with Black Forest Cherry Torte, one of my personal favorites. It consists of layers of decadent chocolate cake filled with whipped cream and cherries and topped off with more cherries and chocolate shavings. I love German pastries, so I was thrilled when I received a copy of Luisa Weiss’ “Classic German Baking,” for Christmas. The book contains all of my favorites, including the Black Forest Cherry Torte. A tour through the book is not quite a trip to Germany, but a close substitute.

Served plain, the cake is especially good for breakfast with a cup of coffee. You can also dust it with powdered sugar or top it with a dollop of whipped cream.

Cherry Cake 5

Kirsch Kuchen

8 Servings

I made this with canned sour cherries. However, you can also use fresh pitted sour or sweet cherries. Feel free to experiment with the fruit. Chunks of fresh plum are good as are any of the summer stone fruits. I am providing both metric and U.S. measurements. However, if you have a kitchen scale, I recommend using the metric measurements.

130 grams/9 tablespoons plus 1 teaspoon butter, room temperature

180 grams/1 cup minus 1 1/2 tablespoons sugar

3 eggs

Zest of 1 lemon

180 grams/1 1/2 cups minus 1 tablespoon flour

1/2 teaspoon baking powder

1/4 teaspoon salt

500 grams/2 cups fresh or canned sour cherries,

powdered sugar for dusting or whipped cream for serving


Preheat the oven to 350 degrees. Line the bottom of a 9-inch springform pan with parchment paper.

Pit the cherries if fresh or drain them if canned. Set aside.

Place the butter and the sugar in the bowl of a stand mixer and beat with the paddle until light and fluffy, scraping down the sides of the bowl with a spatula when necessary. Beat in the eggs one at a time, then add the lemon zest.

In a separate bowl, mix the flour, baking powder, and salt. Add to the butter mixture and beat until just combined. Remove the bowl from the mixer and gently fold in the cherries. The batter will be fairly thick.

Spread the batter in the prepared pan and smooth the top. Bake for 55 to 60 minutes until golden brown and starting to pull from the sides of the pan. Cool in the pan for 20 minutes, then release the sides of the pan and place the cake on a rack to finish cooling. Dust with powdered sugar when completely cool or serve with whipped cream.

Adapted from Classic German Baking by Luisa Weiss


Linzer Star Cookies

cookies-1


Happy Holidays!

montana

We arrived in Montana yesterday to find plenty of snow and some pretty frigid temperatures. Well, frigid to me at least. 26 degrees probably felt like a heat wave to the poor folks who were dealing with 30 below temperatures the previous week. Ouch! We don’t get much chance to see a white Christmas in the Washington, DC area, so I’m hoping the snow sticks around, at least through Sunday.

It’s five days until Christmas. That’s five more days to bake, bake, bake. So let’s get busy, and make some cookies.

cookies-2

I first tasted Linzer Tart when I was in culinary school. I loved the nutty, buttery crust with the contrasting sweet and sour raspberry jam inside. During a two-year stint living in Germany a few years ago I tried every Linzer Tart I could find in Germany, and in neighboring countries as well.

cookies-3

Fast-forward to a few years later, and I discovered Linzer Cookies in a Food and Wine Christmas cookbook. Where have these cookies been all my life? They have all the great taste of the tart, but in one tidy, cookie-size package.

Have fun baking or doing what ever brings you and your family joy during this Holiday season. Merry Christmas from Jeannine’s Cuisine.

Adapted from Food and Wine magazine

cookies-6

Linzer Star Cookies

3 Dozen

Feel free to adjust the type of nuts and the flavor of jam you use for these cookies. They won’t be a traditional Linzer, but give them your own spin. I’m thinking you could do a mixture of macadamia nuts and pineapple jam for a tropical spin on the cookie. Or how about almonds with an orange marmalade or cherry jam?

1/2 pound (2 sticks) butter, softened

3/4 cup sugar

3 large egg yolks

Zest from 1 lemon

1 1/4 cups hazelnuts

1 1/2 cups bread flour

2 teaspoons cinnamon

1/2 teaspoon ground cloves

3/4 cup seedless raspberry jam

1/4 teaspoon anise seeds, ground

1/4 teaspoon ground coriander

Powdered sugar for dusting cookiesCream the butter with the sugar for about 5 minutes in a standing mixer fitted with a paddle. With the mixer running add the egg yolks one-at-a time and then add the lemon zest. In a food processor, combine the hazelnuts with the bread flour and process until finely ground. Add the cinnamon and cloves to the food processor and pulse until mixed. Add the nut mixture to the ingredients in the mixing bowl and mix on low until fully combined. Separate this dough into two discs. Wrap in plastic and refrigerate for at least 1 hour.

Preheat the oven to 350 degrees. Prepare two sheet pans or cookie sheets by covering them with parchment or silicone mats. Working in batches, roll the dough out to 1/4 inch thick. Cut into rounds with a 2-inch round cookie cutter. Use another smaller star-shaped cutter to cut stars out of the center of half of the 2-inch rounds. Place the round cookies on one pan and the cut out cookies on another. Chill any dough scraps and reroll and cut as before. Bake the cookies for 15 minutes, rotating the pans at the halfway point. Let the cookies cool in the pans.

cookies-4

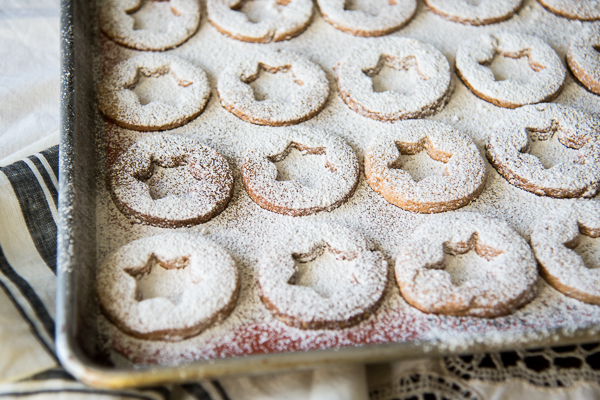
In a small bowl, mix the raspberry jam with the anise and coriander. Use a small strainer to dust the tops of the cut out cookies with powdered sugar. Use a small spatula to spread a thick layer of jam on the cookie rounds and top with a cut out cookie.

cookies-5